Import Export in Tally Prime
टैली में हम डाटा को बढी आसानी से इमोर्ट एक्सपोर्ट कर सकते है इम्पोर्ट एक्सपोर्ट का अर्थ यहाँ डाटा को एक कम्पनी से दुसरे कंपनी या कंप्यूटर में ट्रान्सफर करना होता है |(In Tally, we can import and export the data more easily. Import export means here the data has to be transferred from one company to another company or computer.)
सबसे पहले डाटा को एक्सपोर्ट किया जाता है इसके बाद डाटा को इम्पोर्ट किया जाता है तो चलिए जानते है कि सबसे पहले डाटा को एक्सपोर्ट कैसे करे - (First the data is exported, after that the data is imported, so let's know how to export the data first -)
टैली में कम्पनी के डाटा को एक्सपोर्ट इम्पोर्ट करना (Export import company data in tally)
डाटा में हम टैली से दो तरह के डाटा को इमोर्ट एक्सपोर्ट कर सकते है - (In Data we can import two types of data from Tally-)
1. Master
2. Voucher
Master में जो कुछ भी आता है जैसे लेजर, स्टॉक ,यूनिट, गोडाउन आदि इन्फो को एक्सपोर्ट इम्पोर्ट कर सकते है | (Whatever comes in the master like ledger, stock, unit, godown etc. you can export and import the info.)
वाउचर में केवल वाउचर एंट्री को इम्पोर्ट एक्सोर्ट कर सकते है इसलिए जब भी हम इम्पोर्ट एक्सपोर्ट करते है तो हमसे पूछा जाता है कि क्या एक्सपोर्ट इम्पोर्ट करना है मास्टर या वाउचर -
(In voucher only voucher entry can be imported, so whenever we import export we are asked whether to export master or voucher -)
Master एक्सपोर्ट इम्पोर्ट करना (Master Export Importing -)
टैली में मास्टर को कैसे एक्सपोर्ट करें? (How to export master in tally?)
1. सबसे पहले टैली में वह कम्पनी ओपन करें जिस कम्पनी की मास्टर इन्फो एक्सपोर्ट करनी है | (First of all open the company in tally whose master info is to be exported.)
2. कीबोर्ड पर alt+E दबाकर एक्सपोर्ट ऑप्शन पर जाएँ और यहाँ मास्टर को सेलेक्ट करें | (Go to export option by pressing alt+E on keyboard and select master here.)
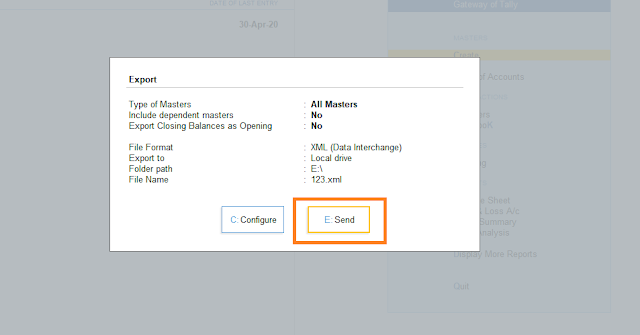
3. मास्टर पर क्लिक करने के बाद एक विंडो ओपन होगी अब Configure पर क्लिक कर हमे यहाँ बताना होगा की मास्टर में क्या एक्सपोर्ट करना है जैसे अकाउंट, स्टॉक, या फिर सब कुछ और साथ ही साथ यह भी बताना होगा को डाटा की फॉर्मेट क्या रखनी है लोकेशन कहाँ एक्सपोर्ट फाइल को सेव करना है आदि जानकरी भरनी होती है | (After clicking on master, a window will open, now by clicking on Configure, we have to tell here what to export in master like account, stock, or everything else as well as tell what format of data to keep Location, where to save the export file, etc. information has to be filled.)
Type of Master - यहाँ यह बताना होता है कि इस कम्पनी से क्या डाटा बहार निकालना है All Master में सारी इन्फो, Ledger में केवल खाते इसी तरह हमे अपनी ज़रूरत के हिसाब से डाटा एक्सपोर्ट करना होता है | (Type of Master - Here it has to be told that what data is to be taken out from this company, all the information in All Master, only accounts in Ledger, in the same way we have to export the data according to our need.)
File Format - यहाँ हमे फाइल फॉर्मेट सेलेक्ट करनी होती है अर्थात एक्सपोर्ट किये डाटा को किस में ओपन करना है जैसे यदि फॉर्मेट xls रखी जाती है तो एक्सपोर्ट की गयी फाइल या डाटा एक्सेल में ओपन होगा ईएसआई तरह हम pdf , JPG आदि फॉर्मेट सेलेक्ट कर सकते है लेकिन अभी हमे डाटा को एक्सपोर्ट कर इम्पोर्ट करना है अर्थात टैली के डाटा को टैली में ओपन करना है इसके लिए फाइल फॉर्मेट xml है | (File Format - Here we have to select the file format i.e. in which format to open the exported data like if the format is kept as xls then the exported file or data will open in excel like esi we can select pdf, jpg etc format But now we have to import and export the data i.e. open the data of tally in tally, for this the file format is xml.)
Export To (Folder Path) - यहाँ हमे वह एड्रेस टाइप करना है जहाँ एक्सपोर्ट किये डाटा को रखना है जैसे D:\ (Export To (Folder Path) - Here we have to type the address where to keep the exported data like D:\)
File Name - Export किये डाटा या फाइल का नाम किया रखना है जिससे बाद में पहचाने में आसानी से हो तो एक नाम दें जैसे 123.xml नाम देने के बाद .xml ज़रूर लिखे (File Name - The name of the exported data or file is to be kept so that it is easy to identify later, then give a name like 123.xml After giving the name .xml must be written)
बस यह भरना ज़रूरी है बाकि फिल्ड यदि आपके लिए ज़रूरी हो तो भरे नही तो इसे ही छोड़ दें सेव कर लें (It is only necessary to fill the rest of the field, if it is necessary for you, then if not filled, then leave it and save it.)
अब SEND पर क्लिक करे आपकी एक्सपोर्ट फाइल उसी लोकेशन पर पहुंच जाएगी जो एड्रेस टाइप किया था जैसे D:\ Drive (Now click on SEND, your export file will reach the same location that you typed the address like D:\ Drive)
इस तरह आप मास्टर डाटा एक्सपोर्ट कर सकते है | (In this way you can export master data.)
टैली में मास्टर को कैसे इम्पोर्ट करें? (How to import master in tally?)
1. सबसे पहले वह कम्पनी ओपन करें जिस कम्पनी में हमे डाटा लेना है | (First of all open the company in which we want to take data.)
2. अब कीबोर्ड पर alt + O दबाकर Import ऑप्शन को सेलेक्ट करें | (Now select the Import option by pressing alt + O on the keyboard.)
3. चूँकि हम मास्टर इम्पोर्ट कर रहे है क्यूंकि हमने मास्टर ही एक्सपोर्ट करके रखे हुए है इसलिए (Master) मास्टर को सेलेक्ट करें | (Since we are importing the master as we are exporting the master, select the master.)
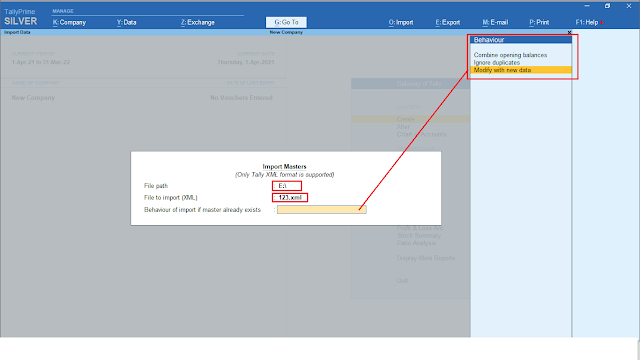
4. File Path में वह एड्रेस टाइप करें और फाइल को सेलेक्ट करें जिस नाम से सेव की थी जैसे D:\ 123.Xml हमने नाम दिया था आप अपना ड्राइव नेम और फाइल नेम टाइप करें | (Type the address in File Path and select the name of the file you saved as D:\ 123.Xml We have given the name, you type your drive name and file name.)
5.Behavior of Import में आपको तीन ऑप्शन दिखाई देंगे यदि पहले से जो अकाउंट इस कम्पनी में मोजूद है तो उनको किस तरह डील करना है | (In Behavior of Import, you will see three options, if the account already exists in this company, then how to deal with them.)
जैसे यदि हम Combine opening Balance Select करते है तो इसमे पहले से इस कम्पनी में मोजूद अकाउंट का बैलेंस और एक्सपोर्ट से आने वाले अकाउंट का बैलेंस जुड़ जायेगा (For example, if we select Combine opening balance, then the balance of the account already existing in this company and the balance of the account coming from export will be added.)
अर्थात् राम नाम से अकाउंट पहले से इस कम्पनी में मोजूद है अब यदि हम दूसरी कम्पनी से डाटा इम्पोर्ट करते है तो राम नाम से खाता वहाँ भी है लेकिन वह बैलेंस अलग अलग है यदि Behavior of Import में हमने Combine opening Balance Select किया है तो यहाँ दोंनो खातो का बैलेंस जुड़ कर एक हो जायेगा | (That is, the account in the name of Ram is already present in this company, now if we import data from another company, then the account with the name of Ram is also there but that balance is different, if we have selected Combine opening balance in Behavior of Import then here The balance of both the accounts will be merged into one.)
Ignore Duplicate option डुप्लीकेट अकाउंट को नही लेगा उन्गहें इगनोर कर देगा (Ignore Duplicate option will not accept duplicate accounts and will ignore them)
Modify With New Data इस ऑप्शन में खाते के बैलेंस को अपडेट कर देगा जैसे राम के खाते का पहले बैलेंस 5000 था और एक्सपोर्ट डाटा में राम के खाते का बैलेंस 8000 है तो एक्सपोर्ट डाटा का जो बैलेंस है बस केवल वही रह जायेगा 8000/- (Modify With New Data will update the account balance in this option as earlier the balance of Ram's account was 5000 and in export data the balance of Ram's account is 8000 then the balance of export data will remain only 8000/-)
यह ऑप्शन केवल तभी ध्यान में रखना है जब आपकी इस कम्पनी में खाते पहले से मोजुद है यदि एक्सपोर्ट डाटा में से पहेले से कोई खता नही है तो आप कोई सा भी ऑप्शन चूस कर सकते है | (This option is to be kept in mind only if you already have accounts in this company, if there is no account already in the export data, then you can choose any option.)
6. इस तरह आप डाटा को कम्पनी में इम्पोर्ट कर सकते है चेक करने के लिए आल्टर में जाकर अकाउंट स्टॉक चेक कर सकते है | (In this way, you can import the data into the company, you can check the account stock by going to Alter to check.)
Voucher को एक्सपोर्ट इम्पोर्ट करना (Export Importing Voucher)
टैली में वाउचर को कैसे एक्सपोर्ट करें? (How to Export Vouchers in Tally?)
1. सबसे पहले टैली में वह कम्पनी ओपन करें जिस कम्पनी के वाउचर एक्सपोर्ट करने है | (First of all open the company in Tally whose vouchers are to be exported.)
2. कीबोर्ड पर alt+E दबाकर एक्सपोर्ट ऑप्शन पर जाएँ और यहाँ Transactions को सेलेक्ट करें | (Go to the export option by pressing alt+E on the keyboard and select Transactions here.)
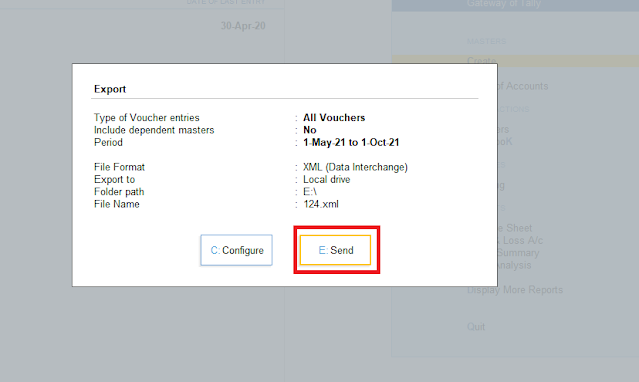
3. Transactions पर क्लिक करने के बाद एक विंडो ओपन होगी अब Configure पर क्लिक कर हमे यहाँ बताना होगा की Transactions में क्या एक्सपोर्ट करना है | (After clicking on Transactions, a window will open, now by clicking on Configure, we have to tell here what to export in Transactions.)
जैसे Accounting Voucher या Inventory Voucher या फिर all voucher entry साथ ही साथ यह भी बताना होगा को डाटा की फॉर्मेट क्या रखनी है लोकेशन कहाँ एक्सपोर्ट फाइल को सेव करना है आदि जानकरी भरनी होती है - (Like Accounting Voucher or Inventory Voucher or all voucher entry as well as it has to be told that what is the format of the data to be kept, location, where to save the export file etc.)
Type of Vouhcer - यहाँ यह बताना होता है कि इस कम्पनी से क्या डाटा बहार निकालना है All Voucher में सारी entry , Accounting Voucher में केवल Account Entry इसी तरह हमे अपनी ज़रूरत के हिसाब से डाटा एक्सपोर्ट करना होता है | (Type of Voucher - Here it has to be told that what data is to be taken out from this company, all entry in All Voucher, only Account Entry in Accounting Voucher, similarly we have to export data according to our need.)
Period - यहाँ यह बताना होता है कि कब से कब तक की एंट्री हमने एक्सपोर्ट करनी है जैसे 01-05-2021 से 01-10-2021 तक जो भी टाइम पीरियड लेना हो वह सेलेक्ट करें | (Period - Here it has to be told that from when till when we have to export the entry like from 01-05-2021 to 01-10-2021, select whatever time period you want to take.)
File Format - यहाँ हमे फाइल फॉर्मेट सेलेक्ट करनी होती है अर्थात एक्सपोर्ट किये डाटा को किस में ओपन करना है जैसे यदि फॉर्मेट xls रखी जाती है तो एक्सपोर्ट की गयी फाइल या डाटा एक्सेल में ओपन होगा इसी तरह हम pdf , JPG आदि फॉर्मेट सेलेक्ट कर सकते है लेकिन अभी हमे डाटा को एक्सपोर्ट कर इम्पोर्ट करना है अर्थात टैली के डाटा को टैली में ओपन करना है इसके लिए फाइल फॉर्मेट xml है | (File Format - Here we have to select the file format i.e. in which format to open the exported data like if the format is kept xls then the exported file or data will open in excel, similarly we can select pdf, jpg etc. But now we have to import and export the data, that is, to open the data of tally in tally, the file format for this is xml.)
Export To (Folder Path) - यहाँ हमे वह एड्रेस टाइप करना है जहाँ एक्सपोर्ट किये डाटा को रखना है जैसे D:\ (Export To (Folder Path) - Here we have to type the address where to keep the exported data like D:\)
File Name - Export किये डाटा या फाइल का नाम क्या रखना है जिससे बाद में पहचाने में आसानी से हो तो एक नाम दें जैसे 124.xml नाम देने के बाद .xml ज़रूर लिखे | (File Name - What is the name of the exported data or file so that it is easy to identify later, then give a name like 124.xml After giving the name .xml must be written.)
बस यह भरना ज़रूरी है बाकि फिल्ड यदि आपके लिए ज़रूरी हो तो भरे नही तो इसे छोड़ दें और सेव कर लें (It is only necessary to fill the rest of the field if it is necessary for you, if not, then leave it and save it.)
अब SEND पर क्लिक करे आपकी एक्सपोर्ट फाइल उसी लोकेशन पर पहुंच जाएगी जो एड्रेस टाइप किया था जैसे D:\ Drive (Now click on SEND, your export file will reach the same location that you typed the address like D:\ Drive)
इस तरह आप Voucher डाटा एक्सपोर्ट कर सकते है |
(In this way you can export Voucher data.)
टैली में Voucher को कैसे इम्पोर्ट करें? (How to Import Voucher in Tally?)
1. सबसे पहले वह कम्पनी ओपन करें जिस कम्पनी में हमे डाटा लेना है | (First of all open the company in which we want to take data.)
2. अब कीबोर्ड पर alt + O दबाकर Import ऑप्शन को सेलेक्ट करें (Now select the Import option by pressing alt + O on the keyboard)
3. चूँकि हम Voucher इम्पोर्ट कर रहे है क्यूंकि हमने Voucher ही एक्सपोर्ट करके रखे हुए है इसलिए Voucher को सेलेक्ट करें | (Since we are importing Voucher because we have exported Voucher only, so select Voucher.)
4. File Path में वह एड्रेस टाइप करें और फाइल को सेलेक्ट करें जिस नाम से सेव की थी जैसे D:\ 124.Xml हमने नाम दिया था आप अपना ड्राइव नेम और फाइल नेम टाइप करें | (Type the address in File Path and select the name of the file you saved as D:\ 124.Xml We have given the name, you type your drive name and file name.)
5. इस तरह आप डाटा को कम्पनी में इम्पोर्ट कर सकते है चेक करने के लिए Display Daybook में जाकर उसी टाइम पीरियड में चेक कर सकते है | (In this way, you can import the data into the company, to check it, you can check it in the same time period by going to the Display Daybook.)
ध्यान रहे यदि कम्पनी में अकाउंट नही है तो वाउचर एंट्री इम्पोर्ट नही होंगी इसलिए पहले वाउचर एंट्री से जुड़े अकाउंट को इम्पोर्ट करे यदि अकाउंट न होतो उसके बाद जब कम्पनी में सारे खाते आ जाएँ तब वाउचर एंट्री इम्पोर्ट करें | (Keep in mind that if the company does not have an account, then the voucher entry will not be imported, so first import the account associated with the voucher entry, if there is no account, then after all the accounts are there in the company, then import the voucher entry.)


No comments:
Post a Comment
Please Do Not Enter Any Spam Link in The Comments Box